Monday, September 2, 2019

Rustic Roasted Tomato Sauce

On the vine in my kitchen garden.

It may be Labor Day, but my tomato plants are still in heavy production mode, and probably will be for some time. And when I look around my dinner table of an evening, I see seven happy, hungry faces looking back at me.

So I make a lot of tomato sauce.

A. Lot.


Today's harvest
And I use it all through the year until the next tomato season, for everything Italian as well as chili, soups, stews ... anything that calls for a 28 oz can of tomatoes, I throw in a quart container of this sauce.
It's not that smooth ultra-processed stuff from a can, but a rustic sauce full of yummy goodness that freezes beautiful and is the easiest way I know to get maximum flavor out of summer tomato bounty.

Here's what you need for 2 quarts:
5.25 lbs ripe tomatoes (I use a combination of mostly Roma with a few dark heirlooms thrown in to enrich flavor profile)
1 large sweet onion, peeled and roughly chopped (about 3/4 lb)
1 bulb garlic (you can use less, but I like a garlicky sauce and garlic has good antioxidants)
Italian seasoning
brown sugar
salt & pepper
Here's 5.25 pounds of tomatoes. The heirlooms are a darker color, funky shaped. The Romas are, well, Romas, those brighter colored oval shaped tomatoes.
Trimmed Romas.
Pre-heat your oven to 400 degrees.

Trim your tomatoes & rough chop. That means cut each one in half, and trim out the white part nearest to the stem, any green non-ripe bits, cracks near the stem or dark spots on the skin. Give each half a squeeze over the sink to dump out the seedy pulpy part.

 Make a quick slice in each half to quarter them.
Rough chopped heirloom. These have
more juice and seeds than Romas.


Throw them all in a big bowl. Once trimmed and squeezed I have about 5 lbs of rough chopped tomatoes.

Rough chopped onions.


Peel and rough chop onions. Today I scored some wonderful red torpedo and candy onions from my CSA, so I'm using a combo of about 3/4 lb all together. Often I just use a nice big Vidalia.
Fancy flavored olive oils.

So you know that bottle of fancy olive oil you bought that time for one recipe and now you don't know what to do with the rest of it? Well now you do.

Drizzle everything in the bowl with olive oil. Really, any kind will do, but today I used some Balsamic-garlic oil. Use whatever you have. It will be fine.

Smashed peeled garlic.
Sprinkle a good tablespoon of Italian seasoning, a tablespoon or two of brown sugar, salt and pepper over everything in the bowl and give it a good stir to distribute everything over your tomatoes and onions.


Garlic in its little foil package.


Now to the garlic.
Garlic is wonderful good-for-you stuff and I use a lot of it. But I hate the lingering smell of raw garlic on my hands. So I indulge in the pre-peeled kind. Melissa's makes my favorite brand. It's a pouch with a lot of little pouches that each contain a whole bulb of garlic, already magically peeled. Take your bulb of peeled garlic and put it into a little "bowl" you make out of a small piece of foil. Drizzle olive oil over it, seal it up. 
Double-lined baking sheet. Much
easier cleanup.

Why are we doing this, you ask? Well, we're roasting our ingredients and this is the best way to roast garlic. Leave these small bits exposed and they tend to burn. And roasting garlic enhances its flavor and brings out natural sweetness.

Line a large rimmed baking sheet with foil. Double-line: two sheets regular foil across, and one sheet nonstick lengthwise. You'll be glad you did.


Ready to go in the oven.
Dump the contents of the bowl into the prepared pan. Tuck your packet of garlic in there somewhere.

Out of the oven.
Roast at 400 for about 45 minutes. Or 350 for an hour.

Let everything cool for 30 minutes. Gather the corners of your foil lining to lift contents out of the pan and carefully transfer to your food processor. There will be a good amount of hot liquid in there, so be careful.

Empty your lovely little packet of fragrant roasted garlic in there as well.
Finished sauce.

And if you are me and you have more fresh basil in your garden than you know what to do with, you throw in a good handful of that as well.

Process your sauce to the texture of your liking, as chunky or as smooth as you like. Here's mine.

Mmmmmmnnnnn! Yummy!


Made two quarts. Leave headroom if you intend to freeze. I've over-filled and had a 'splosion in the freezer. Not pretty.


Wednesday, January 16, 2013

Comfort Cookies


On the plate, l-r, Chocolate Chip, Peanut Butter,
and Oatmeal Raisin cookies.

There are a lot of cookies in the world, but when comfort is what you’re looking for, there are a few, basic, tried-and-true crowd favorites... also quick and easy-peasy, to have in your repertoire.


These three cookies -- chocolate chip (of course!), peanut butter, and oatmeal raisin -- are cookie staples. Not only are they family favorites good for anytime you carve warm, delicious, melt-in-your-mouth goodness served with a glass of icy cold milk, but they are  go-to recipes when you need to whip up a quick batch of something sweet to take to any social gathering and they use ingredients I always have on hand ... no special trips to the grocery store. 

I’m thinking about comfort in particular today, because I need to take something to a funeral reception where sweets in particular is what has been requested. A lot of times when I am taking food to a pot luck or other function, I tend not to choose the overly familiar dishes. But when I started thinking about what to make for a time of grief and sadness, I wanted to choose something that conveys home, comfort and familiarity exactly. 

I have lots of travel ware and lovely serving pieces that I often use for potlucks, parties, etc. But for a funeral reception at a friend’s home, I decided to pack these cookies, once cooled, in large plastic bags. It’s not a time I want someone who’s grieving to worry about getting serving ware back to the right person. I’ll take along a disposable aluminum tray to serve them on. No fuss. No muss.

For this occasion, I made a batch of each type, which was easy to do in a single morning. 

TIPS for SUCCESS
    • Get all ingredients and equipment necessary out on the counter within easy reach. No need to haul out the Kitchen Aid mixer -- a hand mixer is perfect. 
    • I make each dough in succession, popping each one as it is completed into the fridge to firm up a bit before baking. I like cookies that are slightly crispy on the outside, chewy and melty-good on the inside, and that have a nice rise instead of spreading out on the pan. Refrigerating dough helps avoid spread.
    • Use light colored cookie pans instead of dark. Dark colored pans tend to over-brown the bottoms of cookies. 
    • I have 3 really large solid quality cookie pans I rotate when making big batches of cookies. I line each one wit foil or parchment for baking (foil will also help keep bottoms from over-browning if a dark pan is all you have) and after taking each batch out of the oven the sheet of cookies slides easily off the pan to cool, cookies never stick, and then the pan cools pretty quickly to go back into rotation. And no clean up. Using this method I can keep cookies going into the oven steadily.
    • If you make a lot of cookies, it’s worth investing in a cookie scoop. Keeps the size uniform for even baking; gets the job done faster.

One last word about these recipes:  I have made a ton of cookies in my life. I own a wall of cookbooks ranging from Le Cordon Bleu to an old Betty Crocker picture cookbook from my mother’s days as a young housewife, and everything in between. But in my opinion, the very best comfort chocolate chip, oatmeal raisin, and peanut butter cookie recipes I have ever made come off the cardboard Butter Flavor Crisco Sticks label/wrapper. No shit. They are the best. Ever. Of all the recipes I’ve tried over the years.

And they are easily found online, so I’m going to save myself some time and just post the links.

Ultimate Chocolate Chip Cookies (My kids and I prefer chocolate chip cookies without the nuts. Leave them out and throw in another 1/2 cup or more chocolate chips if you like chocolate like I do. Semi-sweet chocolate is a must. Mini-chips also acceptable. Keep your white chocolate. Not a fan.)

Ultimate Chewy Oatmeal Raisin Cookies (I put 1/2 cup chopped walnuts in half the dough and keep the other half plain.)

Ultimate Peanut Butter Cookies (You can do these as simple drop cookies if you want, but I use the cookie scoop - of course - and quickly roll each scoop into a ball and roll it in sugar then use fork tines to slightly flatted the dough ball making the traditional criss-cross pattern on the peanut butter cookie.)

Sunday, January 13, 2013

Essential Ingredients -- Mirepoix


Sauteing mirepoix
In cooking, like in life, there are essential building blocks I return to time and time again -- practices that consistently prove to form a solid foundation for achieving whatever particular goal it is I have in mind. 


As a voice actor, I have a combination of ingredients in the right proportion that I need to perform well -- like vocal warmups, hot tea and Claritin -- that keep the pipes lubed and clear. When I’m cooking, I often turn to mirepoix as an essential, along with other techniques and practices I find fundamental to the way I approach my love of the kitchen.

As these are winter months and I’m engrossed in a lot of sauces, soups and stews, I’m using mirepoix a lot. Since my goal in this blog is to journal life in my kitchen through the year and mirepoix is at the fore so frequently, it makes sense to me to spend some time in the early days of this blog covering basics. That way if I refer to something in later posts, I can link back to it.

Fundamentals of Mirepoix


Traditional mirepoix is a combination of onions, celery and carrots, also known as aromatics, that are the basis of countless stocks, soups, stews and many other dishes. Although the term originates with the French, variations are commonly found in all kinds of cultural cuisines. It is also called the Holy Trinity in some cooking cultures.

There are a two basic guidelines to mirepoix:

The proportions are 2/1/1 onions, celery, carrots. So for every cup of onions you want 1/2 cup celery and 1/2 cup carrots.

When cutting, you want all the pieces in a uniform size so they cook evenly. Sometimes this means a rough chop, a dice, or a mince, but all three ingredients should be cut to similar size in a given recipe.

Mirepoix is almost always sauteed gently over medium to medium low heat in some kind of oil or fat at the beginning of a recipe, usually for about 5 minutes stirring often until the aromatics soften and become fragrant. You don’t want them to burn, so resist the temptation to raise the temperature in order to hasten the process.  If you are in that much of a hurry, go make a peanut butter sandwich. Sometimes mirepoix is added in later without pre-cooking it, sometimes it’s roasted in the oven along with other things. Each recipe will detail the specific cooking process.


The pre-minced garlic you can
buy is poor stuff; but I do love
the convenience of the pre-peeled.
The Melissa's brand, in a resealable
bag, offers a number of smaller
air-pack sealed pouches each contain-
ing a number of cloves.
Here, I'm adding the minced
garlic to the mirepoix saute
after the vegetable have
softened.
Often garlic is added to a mirepoix saute. Use the flat side of the knife to smash the garlic, then mince. Always add the garlic in the last minute of cooking. It burns easily and becomes bitter if sauteed too long. 


MIREPOIX DICING TECHNIQUE


Since we are dealing with dicing onions, celery and carrots let’s talking about dicing each. For heavens sake, invest in decent cutlery. That’s knives. Look for knives where the tine -- the metal part -- runs all the way through the handle of the knife. Use the proper tool for the job, which in this case is either a chef’s knife or Satoku knife. You want a wide bladed knife for dicing up vegetables. And keep them sharpened. You can get an inexpensive sharpening tool even at Walmart, but they are corporate asshats, so I am boycotting them. Trying to dice vegetables with a dull or tiny knife, or worse a dull tiny knife, is a tedious process.

CELERY

Yup, I'm a lefty, so this is how I slice,
left to right. I'd like to take this opportunity
to point out how challenging it is to be your
own food photographer.
A bunch of celery consists of stalks attached to a root bulb, from the thicker more mature stalks on the outside to the more tender inside shoots referred to as the celery heart. All of it, including the leaves, is delicious. When I buy celery, I wash it as a whole, keeping the root bulb intact, and drying it as thoroughly as possible, storing it in a plastic bag with a sheet of paper towel to absorb extra moisture. I tend to use celery frequently, so rarely does a bunch grow so old it grows limp. Older vegetables are perfect to use in stock and soup bases.

Anyway, I know most people probably pull off a stalk at a time when they use celery, but unless I’m stuffing stalks (which is usually only at the holidays,) I use it from the tip end down, slicing through the whole thing, in think slices, and dicing it from there. I think this is a more efficient way to use it and it saves time when doing a lot of chopping/dicing/mincing. Plus I get the flavor and texture benefits of both outer and inner parts.

CARROTS

You don’t have to peel a carrot (or an onion, when making stocks and broths, but you do for pretty much everything else. Certainly mirepoix. Carrots are tricky to dice -- I’ve cut myself many a time, so take care. They are a hard vegetable, and round to boot, so it’s easy for the knife to slip. To avoid this, here’s what I do: Once peeled, cut the whole thing across in the middle, so you have two pieces about 4 inches long. Then carefully slice each one down the center, trying to keep the halves  about the same size. Once you have done that, you now have 4 quarter carrots, each with a flat side. Put the flat sides down on the cutting board (you are using a cutting board right? So you don’t ruin your countertop?) and this makes them much easier to then slice without the damned things rolling around and nicking yourself with a sharp knife. Slice each quarter lengthwise 1, 2 or more times, depending on the size of the carrot. Now you have what are known as matchsticks. Then it’s easy to line these up and slice across several at a time, producing a dice. Whatever hand you use to knife, your slicing motion should be down and away from you, toe to heel of the knife. In your other hand, hold the slices of vegetable together with the tips of your fingers curled under. With practice you can get faster and make short work of dicing.

ONIONS

The quicker job you can make of cutting up onions, the less chance of making your eyes tear up. Onions range from strong to sweet in flavor, and the stronger the onion the more intense are the chemicals released when the membranes are crushed. 

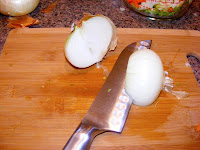
So, to dice onions and avoid the tears, let the layered structure of the onion do some of the work for you: first slice the onion in half lengthwise, from tip to root bulb. Lay each half flat side down on the cutting board, and take a small slice off the tip end (not the root). Pull the thin papery peel back off toward the root. 

Holding the onion at the bulb end with fingers curled under, make a series of even vertical slices about 1/4 inch apart from tip toward the root, never cutting through the root end. 


Then make another series of horizontal slices from the tip to the root end, again leaving the root intact.


Now cut across the onion side to side starting at the tip end and working down to the root, with closely spaced slices. Voila! Diced onion. No tears.

Saturday, January 5, 2013

Senate Bean Soup with Buttermilk Cornbread

Snowfall from my kitchen window.
Snow means comfort food is on the menu. 

This soup is a classic pairing of beans and ham, and is based on the Senate Bean Soup that has been on the menu in the U.S. Senate's lunchroom every day for almost 100 years. It's said to have been a favorite of Senator Ted Kennedy. My adaptation is from a recipe I found in Cuisine at Home, one of my all-time favorite recipe sources. This one was a big hit with my husband, Gary. He's a Libertarian so I didn't mention the Kennedy connection.
Senate Bean Soup served with Buttermilk Cornbread

Senate Bean Soup

Makes about 12 cups or 8 servings. Soak time: 8 hours or overnight.  Prep time: 30 minutes. Cook time: 4-5 hours (high); 5-6 hours (low).

This is a slow cooker recipe, and also uses dried beans which need to be soaked. So this is definitely a meal to start the day before you plan to serve it. But the time you actually spend cooking is minimal.   NOTE: Do NOT add salt to beans until the end of cooking time.  Salt toughens the beans before they tenderize, making them nasty nuggets. 

Ingredients:   

1 lb. dry Navy beans (or other white beans), sorted and rinsed
            12 cups water (6 to soak beans, 6 for soup)
            1/2 tsp baking soda
            2 Tbsp unsalted butter
            2 Tbsp olive oil
            1 cup diced carrot
            1 cup diced celery
            2 cups diced onion
            2 Tbsp minced garlic (more or less, according to   your preference. I use LOTS. Garlic has lots of antioxidant health benefits.)
            1 1/2 - 2 lbs smoked ham hocks
          1 bay leaf
            (1 cup leftover ham)
          1/2 cup instant potato flakes 
             1/4 cup minced fresh Italian (flat leaf) parsley
             Salt and pepper to taste
   
Soak the beans 8 hours or
overnight.
SOAK rinsed and sorted beans in 6 cups water in a large pot, covered and refrigerated, for 8 hours or overnight.

Adding baking soda helps
the beans soften and
cook faster.
AFTER SOAKING, add 1/2 tsp baking soda to the pot. Bring beans to a boil on med-high and then turn them down to med-low to simmer for 10 minutes.  

(While the beans are simmering, save time and cut up the vegetables for the next step. You can throw the onions, carrots and celery together in a bowl. Keep the garlic separate for now.) 

Some fugly-looking foam will arise. Skim this off and discard. Drain the beans and rinse them well to remove any nasty foam vestiges. Transfer the beans to a 6 qt. slow cooker and stir in 6 cups water.

Add garlic after the
mire-poix has softened.
MELT butter and olive oil together in large saute pan over medium heat. Add the onion, celery and carrot (also known as mire poix, worthy of a post of its own) and saute, stirring occasionally, until the vegetables are softened, about 5 minutes. 

After the vegetables have softened, add the minced garlic and cook for about a minute, or until you get a nice nose-hit of ode de garlic. The reason you add it later is because garlic turns bitter quickly if it browns. You don't want any of this mixture to brown.

Transfer the vegetables to the slow cooker.

ADD the bay leaf and ham hocks to the slow cooker, making sure they are submerged under the liquid so they don't dry out. 

COVER AND COOK 3.5 to 4.5 hours on high or 4.5 to 5.5 hours on high, or until beans are tender.

Hocks submerged.
REMOVE ham hocks and let cool slightly until safe to handle. Personally, I wear non-latex gloves in the kitchen a lot to protect my hands and this is one time when they come in really handy.  When the hocks are cool enough to handle, use your hands to pull meat from the bones, and this is much easier and more pleasant when gloved. Discard the fat and bone, and cut meat into bite-sized chunks.  Return the ham to the pot.

If you like extra ham in your soup, and you have leftovers from the holidays, this is the time  to add in a cup (or as much as you like) to the pot. You can certainly use deli ham if that's what you have. It's a good use for it when you have more than you think you will be using for sandwiches before the expiration date.

SEASON with salt and pepper to taste. It's always better to season later in your cooking process, especially if you are using any ingredients (like ham) that have salt content to begin with. Salt increases in intensity as food cooks down.

STIR IN potato flakes and parsley. The potato flakes help thicken the soup slightly. NOW is the time to start your cornbread is you are serving it with this meal, and it's a perfect pairing with things hammy. The soup will simmer for 30 more minutes, or about the time it will take to make and bake the cornbread.

Buttermilk Cornbread

This recipe is a little different from the one on the cornmeal package. It uses buttermilk, which produces a tender crumb, and honey as the sweetener. So it's a fairly Southern take on cornbread.

PREHEAT oven to 425. Always bake in a preheated oven, and always check for doneness sooner rather than later in the suggested baking time.
Ingredients:
1 cup white or yellow cornmeal
1 cup unbleached flour (I use unbleached flour for everything unless a specialty flour is called for)
1 Tbsp baking powder
1 tsp Kosher salt (I also use Kosher salt all the time)
2 eggs
1 1/4 cup buttermilk
1/4 cup honey (although you can use white sugar if that's what you have)
4 Tbsp unsalted butter, melted

COAT and 8 inch cast iron skillet with non-stick cooking spray. No, you don't have to use a cast-iron skillet -- you can use an 8 inch cake pan or 8 inch square brownie pan. But cornbread in a cast-iron skillet is traditional, and gives a nice crispy texture to the sides and bottom which is great mouth-feel combined with the melt-in-your-mouth buttermilk crumb.

WHISK together the dry ingredients in a large mixing bowl. Set aside.

COMBINE buttermilk, honey, eggs and butter. Beat them together. I do this all in a 4-cup Pyrex measuring cup to save on clean-up: I measure in the buttermilk and honey first, then the two eggs and beat them together. Then I slowly pour in the melted butter while whisking. I melt the butter ahead of time in the microwave and pour it in slowly, last, while whisking, because you don't want the hot butter to cook your eggs. Then you have scrambled crap. Not good.

STIR wet ingredients into dry ingredients just until the dry is thoroughly moistened. Don't overmix or use a hand mixer.

POUR batter into prepared skillet and bake 15-20 minutes. Err on the 15 minute side in case your oven runs hot. You want the top lightly browned and it should spring back if you gently push it with your finger. 

Remove from the oven and let cool slightly while you stir and ladle up your soup. 
Serve the cornbread on the side with butter, or you can serve a wedge of cornbread in the bottom of the bowl and ladle the soup over it the way Paw-Paw would.


Getting Started - Mise-en-place

My kids (well, one in particular) have been after me for a while now to put together a collection of recipes for their favorite dishes from my kitchen. So that's what this blog is about, and we'll see where else it may go. Mimi is what my two little granddaughters call me. They are big helpers in Mimi's kitchen when they visit. I suspect that this will be more than about food and cooking itself, but also about life, family, home, art and creativity. Food is so much more than just a means of sustenance.

It seems appropriate, therefore, to start with the concept of mise-en-place.

Mise en place at a Thai cooking school

Mise-en-place (pronounced [miz on plas]) is a French phrase which means "everything in place", as in set up. It is used in professional kitchens to refer to organizing and arranging the ingredients (e.g., cuts of meat,relishes, sauces, par-cooked items, spices, freshly chopped vegetables, and other components) that a cook will require for the menu items that he or she expects to prepare during his/her shift.[1] -- from Wiki
 If you know me at all, you know that I can get a little OCD about things being in their proper place and having a proper place for all things. It's a life philosophy (and a spiritual principle) that I embrace. When things are out of order, displaced and chaotic in my physical space it is often an indicator that things are wacky on some other plane in my life. Likewise, I believe that physical order is the foundation to peace, harmony, serenity and all the other notions of old hippiedom I cling to. It is certainly necessary for success in the kitchen, especially if you are going to tackle things more complicated than peanut butter sandwiches. And for that, you don't need help from me.

But if you want to buy a house, direct a play, raise a child, guide a career path, change the world, or just make a really scrumptious Coq au Vin, you need to embrace the concept of mise-en-place and get everything in place beforehand so you can do the job right, without scrambling at the last minute for something you need and blowing the timing.

So this is my project for 2013. It's January 5, it's snowing outside, and that's always a good time to cook. I'm going to attempt to journal, via this blog, my forays in the kitchen and their relationship to my life, and hope it will be of some value to family and friends, and anyone else who's interested. There will be the dishes that are family favorites, other things I just like to make for the fun and challenge of it, and new experiments as well. I've cleared some counter-space (always at a premium), my camera is at the ready. The mise-en-place is set. Wish me luck with this little venture.